
Page 152 - master
P. 152
Directions for use for Thoracoscopic 3-Way-Tap
1.0 General information 3.0.1 Inspect chrome 4.0 Care and Cleaning of
• Please read these directions carefully plating individual components
before using the instrument. • Inspect instrument carefully for damage to
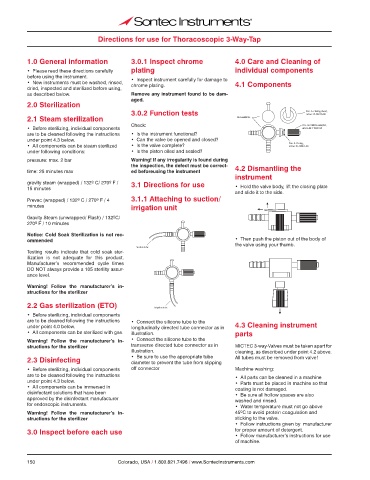
• New instruments must be washed, rinsed, chrome plating. 4.1 Components
dried, inspected and sterilized before using,
as described below. Remove any instrument found to be dam-
aged.
2.0 Sterilization
3.0.2 Function tests Pos. 3: closing sheet,
art.no.12-06210-00
2.1 Steam sterilization Not available
Check: Pos. 4: rotation adapter,
• Before sterilizing, individual components art.no.04-11000-04
are to be cleaned following the instructions • Is the instrument functional?
under point 4.3 below. • Can the valve be opened and closed?
• All components can be steam sterilized • Is the valve complete? Pos. 5: O-ring,
art.no.15-12051-50
under following conditions: • Is the piston oiled and sealed?
pressure: max. 2 bar Warning! If any irregularity is found during
the inspection, the defect must be correct- 4.2 Dismantling the
time: 25 minutes max ed beforeusing the instrument
instrument
gravity steam (wrapped) / 132º C/ 270º F / 3.1 Directions for use
15 minutes • Hold the valve body, lift the closing plate
and slide it to the side.
Prevac (wrapped) / 132º C / 270º F / 4 3.1.1 Attaching to suction/
minutes irrigation unit
Gravity Steam (unwrapped/ Flash) / 132ºC/
270º F / 10 minutes
Notice: Cold Soak Sterilization is not rec-
ommended • Then push the piston out of the body of
the valve using your thumb.
Suction tube
Testing results indicate that cold soak ster-
ilization is not adequate for this product.
Manufacturer’s recommended cycle times
DO NOT always provide a 105 sterility assur-
ance level.
Warning! Follow the manufacturer’s in-
structions for the sterilizer
2.2 Gas sterilization (ETO) Irrigation tube
• Before sterilizing, individual components
are to be cleaned following the instructions • Connect the silicone tube to the
under point 4.0 below. longitudinally directed tube connector as in 4.3 Cleaning instrument
• All components can be sterilized with gas. illustration. parts
Warning! Follow the manufacturer’s in- • Connect the silicone tube to the
structions for the sterilizer transverse directed tube connector as in MICTEC 3-way-Valves must be taken apart for
illustration. cleaning, as described under point 4.2 above.
2.3 Disinfecting • Be sure to use the appropriate tube All tubes must be removed from valve!
diameter to prevent the tube from slipping
• Before sterilizing, individual components off connector Machine washing:
are to be cleaned following the instructions • All parts can be cleaned in a machine
under point 4.3 below. • Parts must be placed in machine so that
• All components can be immersed in coating is not damaged.
disinfectant solutions that have been • Be sure all hollow spaces are also
approved by the disinfectant manufacturer washed and rinsed.
for endoscopic instruments. • Water temperature must not go above
Warning! Follow the manufacturer’s in- 45ºC to avoid protein coagulation and
structions for the sterilizer sticking to the valve.
• Follow instructions given by manufacturer
3.0 Inspect before each use for proper amount of detergent.
• Follow manufacturer’s instructions for use
of machine.
150 Colorado, USA / 1.800.821.7496 / www.SontecInstruments.com